





How To Set Up Meta Pixel And Conversions API Together
If you are running Facebook or Instagram ads, you probably want to know what happens after someone clicks on your ad. Do they visit your website? Do they fill out your form? Do they buy something? This is where conversion tracking becomes important. Many advertisers use the Meta Pixel to track these actions. It records activity on a website and sends that information to Meta. But there is a problem: sometimes the Pixel does not receive every event. Browser privacy settings, ad blockers and other restrictions can affect the information being sent.
To improve tracking, Meta also provides the Conversions API (CAPI). It allows a website to send event information directly from its server to Meta instead of depending only on the visitor's browser. The good thing is that you do not have to choose between these two tools. You can use the Meta Pixel and Conversions API together. The Pixel can collect events from the browser, while CAPI can send events from the server. When both are set up properly, they can give advertisers a better view of what people are doing on their websites. Get Meta ads agency account here

But there is one thing you should not ignore. If both tools send information about the same purchase or lead, Meta needs to recognise that it is the same action. Otherwise, the conversion could be counted twice. This is called event deduplication, and we will explain how to set it up below. In this guide, we will go through the complete process, from finding your Pixel in Events Manager to connecting CAPI and checking whether everything is working.
What Is Meta Pixel?
The Meta Pixel is a small piece of code that you add to your website. Its job is to record certain actions taken by visitors and send those events to Meta. For example, imagine someone clicks on your Facebook ad and visits your online store. They look at a product, add it to their cart and then complete a purchase. The Pixel can record these actions if the correct events have been installed on your website.
Some common events include PageView, ViewContent, AddToCart, InitiateCheckout, Lead and Purchase. You do not need to use every event. The ones you choose should depend on what your website does and what you want to measure. The Pixel is useful because it helps advertisers understand what visitors do after reaching their website. It can also help with audience building and campaign optimisation.
However, the Pixel depends on the visitor's browser to send information. If the browser blocks a tracking request or the tracking script does not work properly, an event may not reach Meta. This is one reason advertisers look at server-side tracking as well.
What Is Meta Conversions API?
The Meta Conversions API, usually called CAPI, gives businesses another way to send website events to Meta. The main difference is where the information comes from. The Pixel sends events through the visitor's browser, while CAPI sends them from the website's server or another supported system.
Let's take a simple example. A customer buys a product from your website. Your website records the order after the payment is completed. With CAPI, the server can send a Purchase event to Meta using that order information. This is useful because the server does not depend on the same browser tracking process used by the Pixel. It can provide another source of event information when browser tracking is limited.
CAPI is not only for online stores. A business that collects enquiries through a form can also use it to send Lead events. Businesses using a CRM may also send certain customer actions from their systems, depending on their setup. It is important to understand that CAPI does not guarantee that every conversion will be tracked. It is another way to send event information, and it still needs to be configured correctly.
Why Use Meta Pixel And Conversions API Together?
You might be wondering why you need both tools when they can send information about the same website actions. The reason is simple: they work in different ways. The Pixel sends information from the browser, while CAPI sends it from the server. Using both can help cover situations where one method does not successfully send an event.
For example, a visitor may submit a lead form. The Pixel can send the Lead event from the browser, and your website's server can send the same event through CAPI.
This gives Meta two ways of receiving information about that action. When the events are matched correctly, Meta can recognise that they refer to one lead rather than two different leads. It can also help advertisers get a clearer view of campaign results. However, the quality of the setup matters more than simply turning on both tools. Incorrect event names, missing event IDs or repeated Pixel installations can create problems.
How To Set Up Meta Pixel And Conversions API Together
Before starting, make sure you have access to your Meta Business Portfolio, Events Manager and website. If you use Shopify, WordPress or another website platform, you may also need access to its settings or an administrator account.
Step 1: Find Or Create Your Meta Pixel
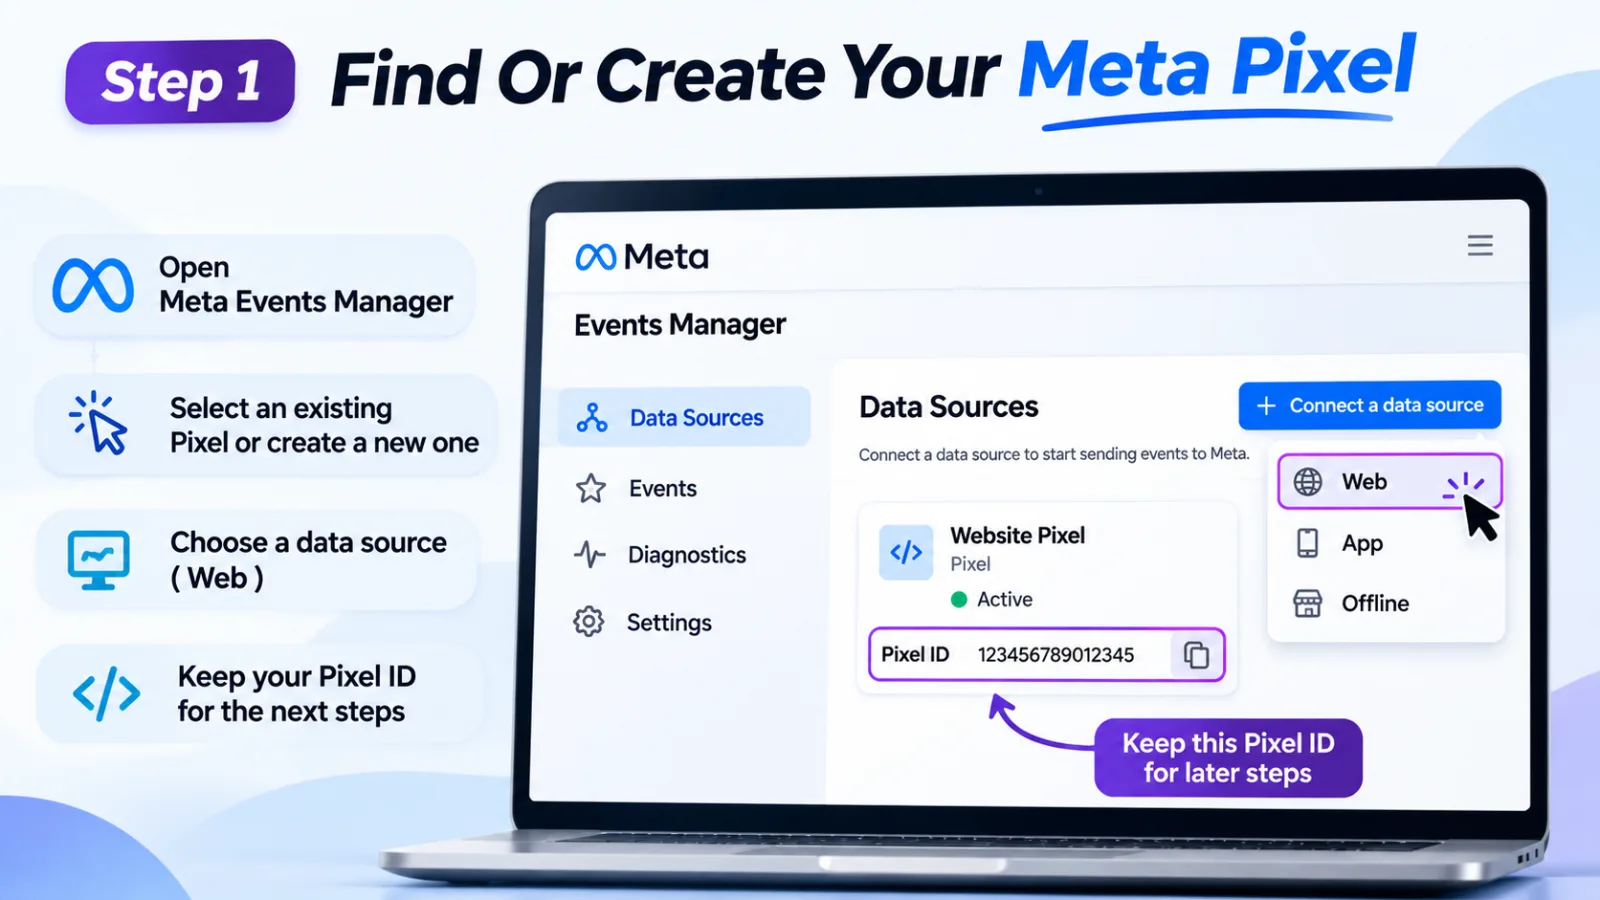
First, open Meta Events Manager using the business account connected to your advertising activity. This is where you can manage your website data source and check the events being received by Meta. If you have already created a Meta Pixel, select that existing data source. There is no need to create another one just because you want to add the Conversions API.
If you are setting it up for the first time, choose the option to connect a data source, select Web and follow the instructions shown by Meta. You may see the term dataset in some parts of the interface. Meta has updated the way it manages data sources, so the wording can vary.
Once you have selected the correct data source, keep the Pixel ID available. You will need it when connecting your website and setting up server-side events. Before moving ahead, double-check that you are using the correct business account and data source. This small check can save you from connecting your website to the wrong Pixel.
Step 2: Install The Pixel On Your Website
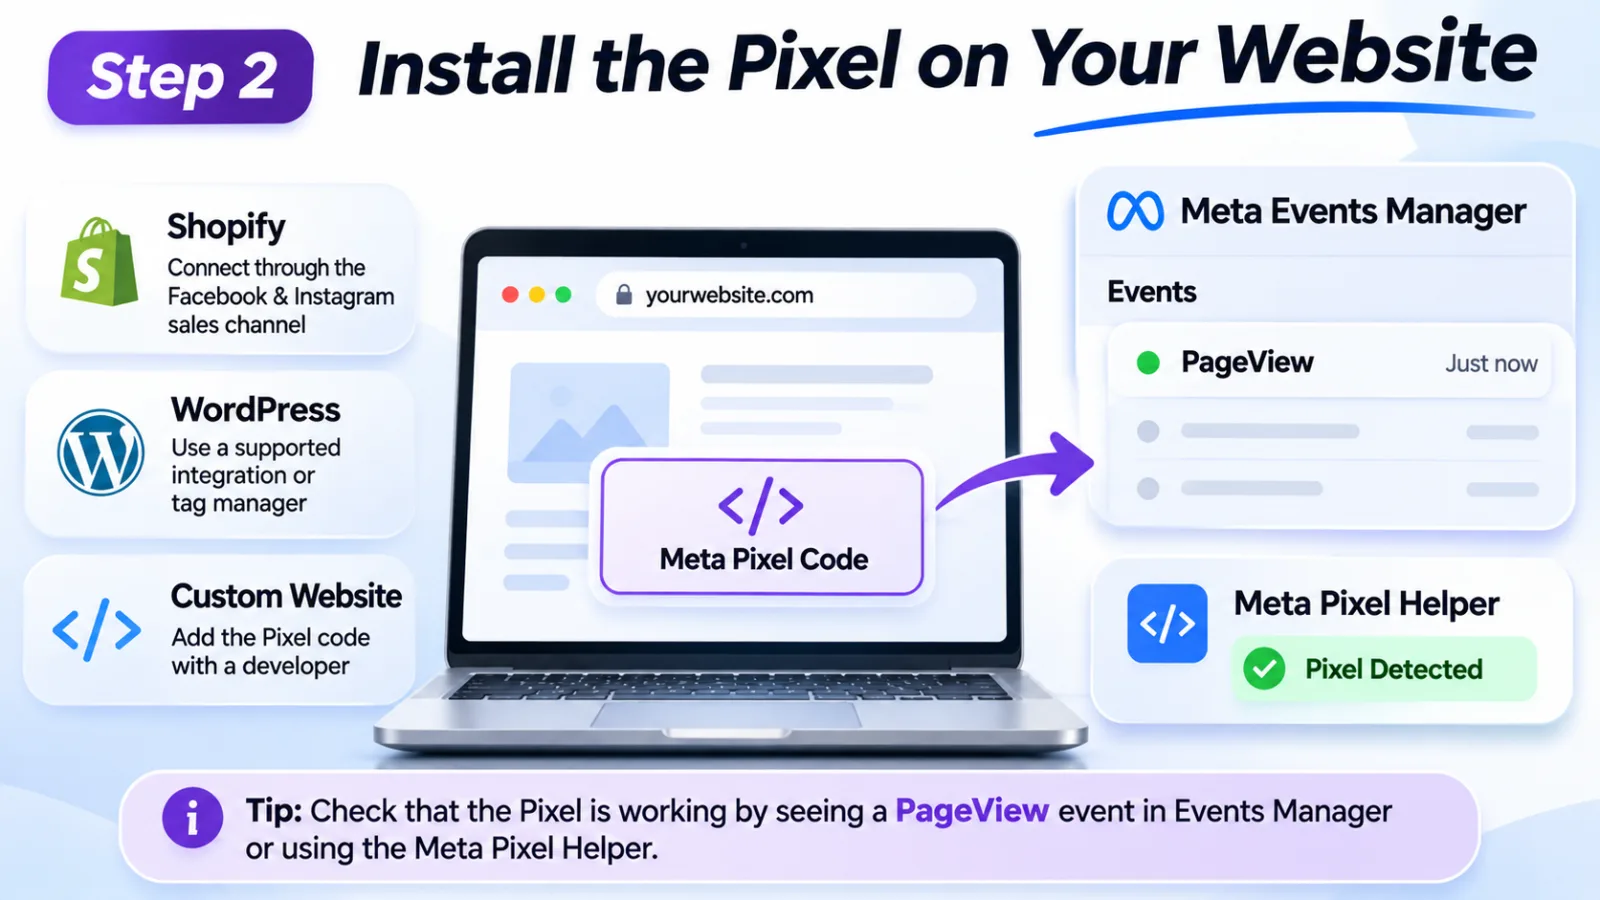
Now you need to make sure the Pixel is actually working on your website. The easiest installation method depends on the platform you use. For example, Shopify users can connect their Meta business assets through the Facebook and Instagram sales channel. WordPress users can use a supported integration or a tag management setup. If you have a custom-built website, a developer can add the Pixel code to the website.
Once it is installed, visit your website and check whether Meta receives a PageView event. You can do this through Events Manager. The Meta Pixel Helper browser extension can also help you check whether the Pixel is detected on a page.
Do not rush to install extra tracking plugins if the Pixel is already working. Sometimes website owners install it through a plugin and then add the same code again through Google Tag Manager. This can cause the same browser event to fire more than once. Get the basic Pixel installation working first. Once you know that browser events are being received correctly, you can move on to the Conversions API.
Step 3: Choose How You Want To Connect The Conversions API
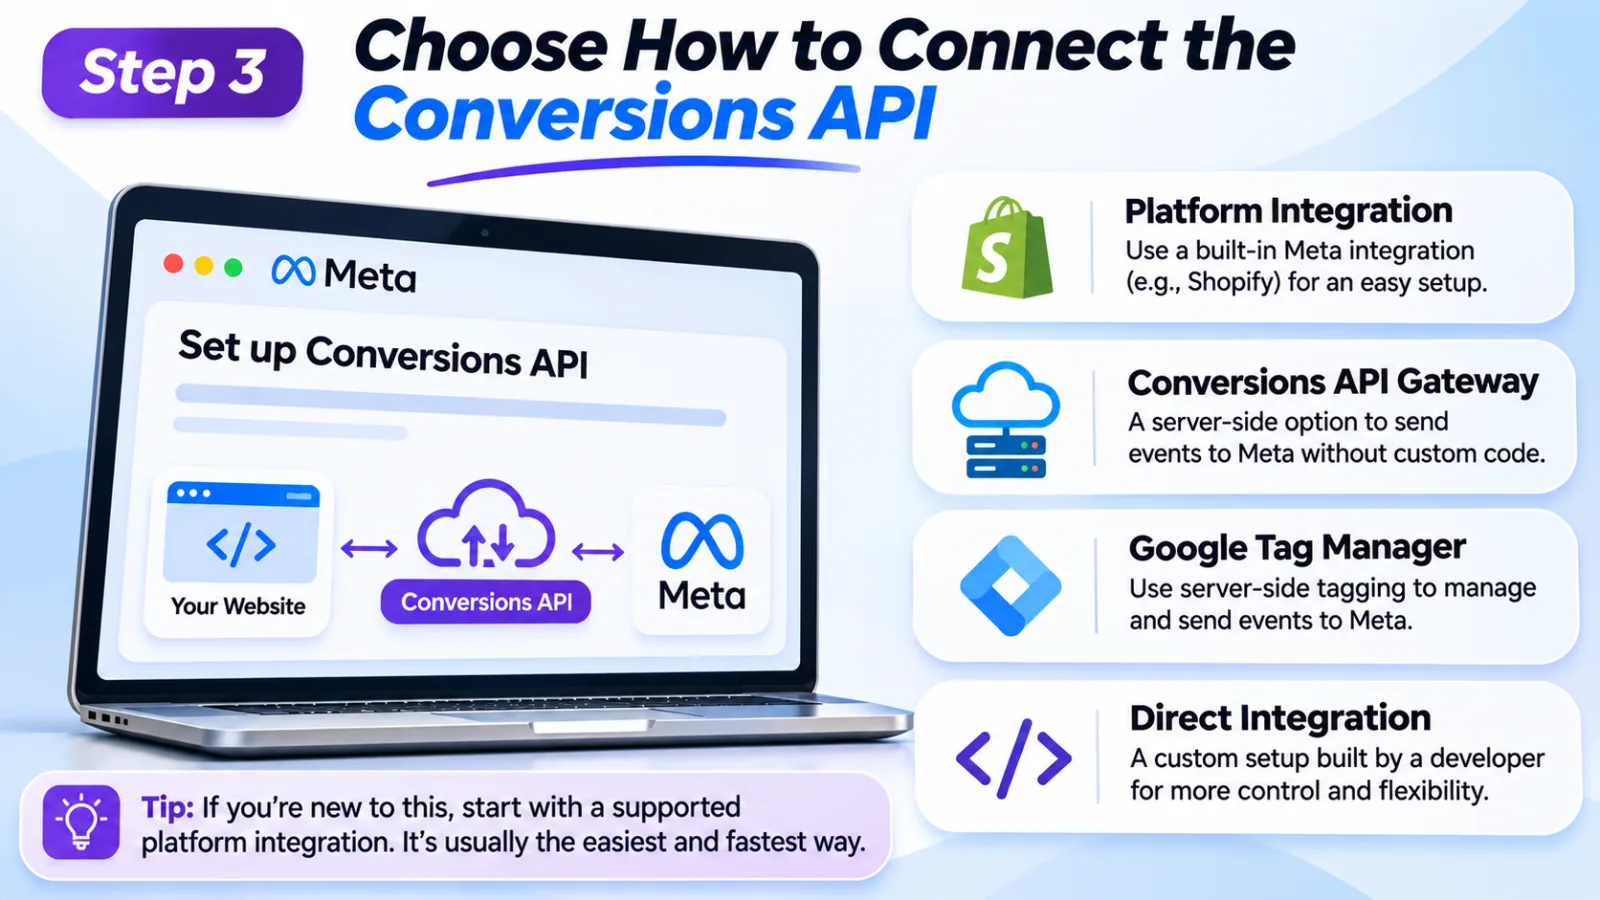
There is more than one way to set up CAPI, so take a moment to choose the method that fits your website. If you use Shopify or another supported e-commerce platform, check whether it offers a Meta integration. This is often the easiest option because the platform can handle much of the connection for you.
Another option is Conversions API Gateway, which provides a way to send events to Meta through a server-side setup. Businesses that use Google Tag Manager may also consider server-side tagging. If you have a custom website, a developer can build a direct integration using Meta's Conversions API. This gives more control over which events are sent and what information is included, but it requires access to the website's backend and some technical knowledge.
For someone setting this up for the first time, a supported partner integration is usually a sensible place to start. You do not need to build a custom system if your website platform already provides a suitable connection.
Step 4: Connect CAPI To The Same Data Source
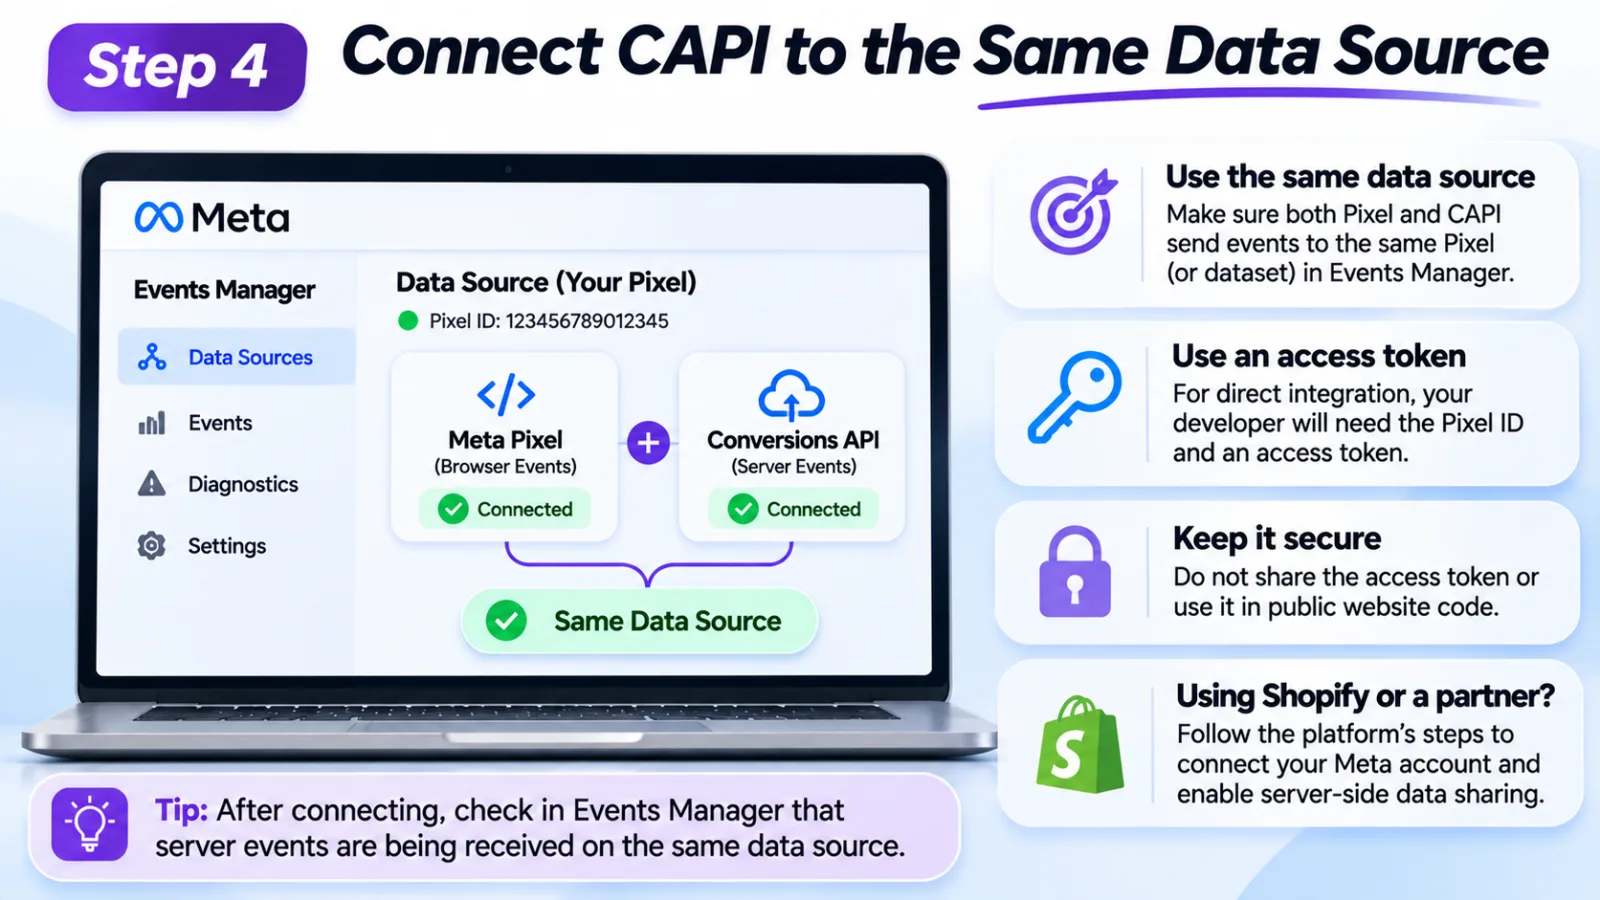
After choosing your setup method, connect the Conversions API to the same Meta data source that receives your Pixel events. This part is important. If your browser events are going to one Pixel and your server events are going to a different data source, Meta will not be able to match them as intended.
For a direct integration, follow the setup instructions in Meta Events Manager. Your developer may need the Pixel ID and an access token to authenticate server requests. The exact steps depend on the integration method you choose.
Keep the access token private. It should be stored securely on the server and should not be placed in public website code or shared with people who do not need it. If you are using Shopify or another partner integration, follow its instructions to connect the correct Meta business account and enable server-side data sharing. After the connection is made, check that the server events are being sent to the correct data source. Do not assume that CAPI is working just because you have completed the connection screen. You will check the actual events later.
Step 5: Select The Events You Want To Send
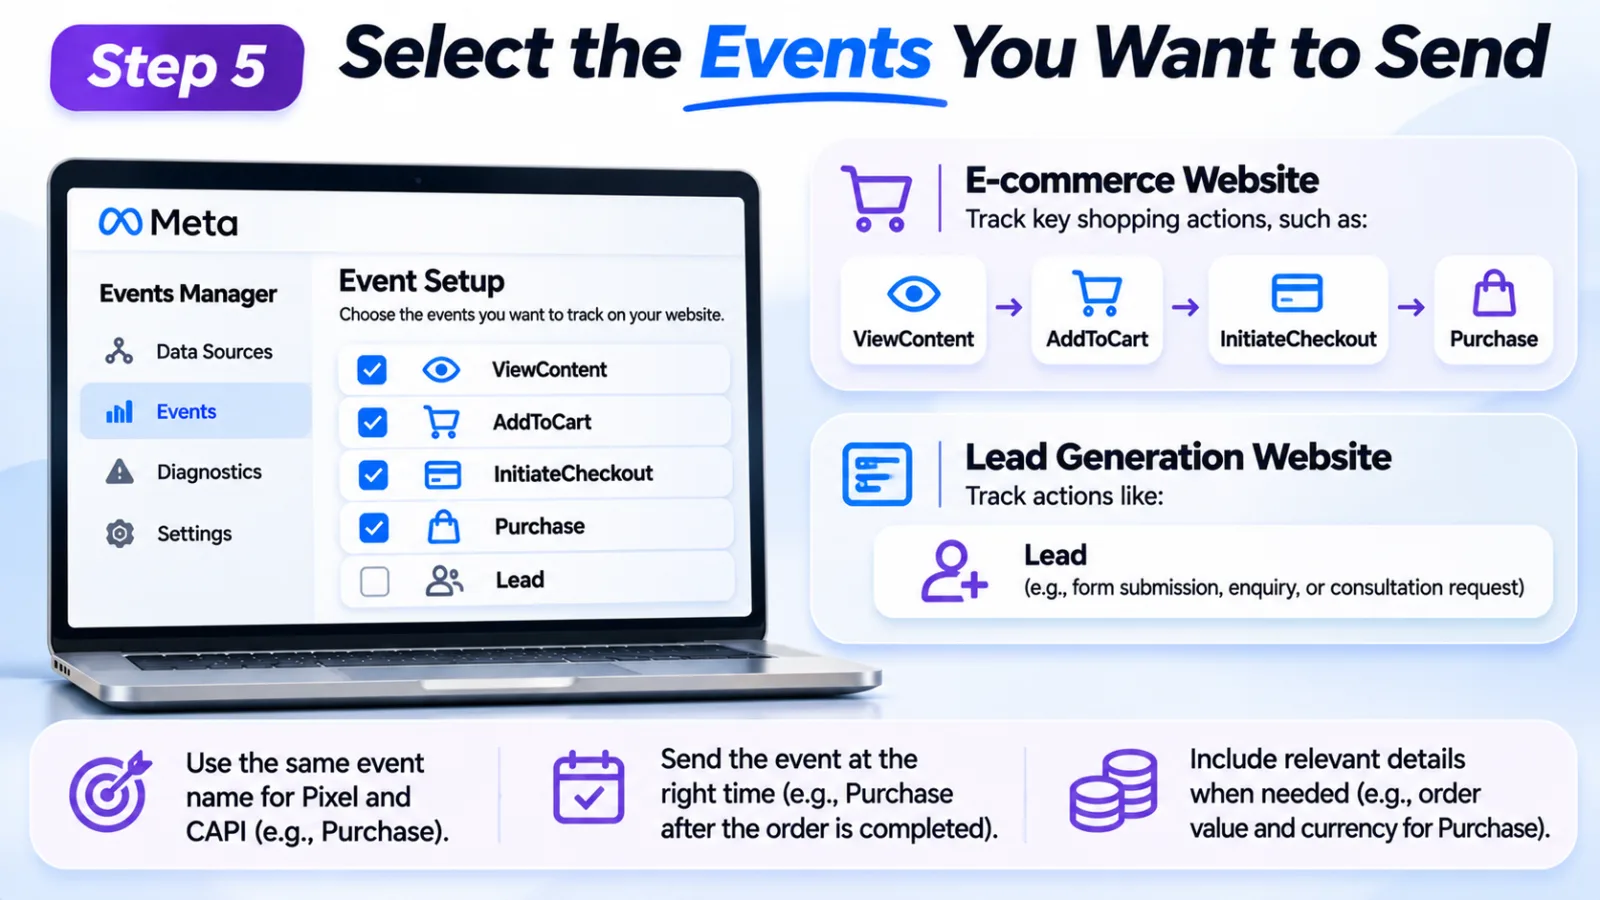
Before testing the setup, decide which actions you want to track. There is no need to send every possible event if it does not help you understand your business. For an online store, you may want to track when someone views a product, adds it to the cart, starts checkout and completes a purchase. These actions help you understand where customers are in the buying process.
For a website that collects enquiries, the Lead event may be more important. You might want to record when someone successfully submits a contact form or requests a consultation. Make sure the event is sent at the right time. For example, a Purchase event should normally be sent after an order is successfully completed. It should not fire simply because someone clicked a button to open the checkout page.
You should also use the same event name when the browser and server report the same action. If the Pixel sends Purchase but the server sends a different custom event for that same order, matching the two events becomes difficult. Check the event details before moving forward. For a purchase, this may include the order value and currency. For a lead, it may include information about the form submission. Only send information that you are permitted to collect and share.
Step 6: Set Up Event Deduplication
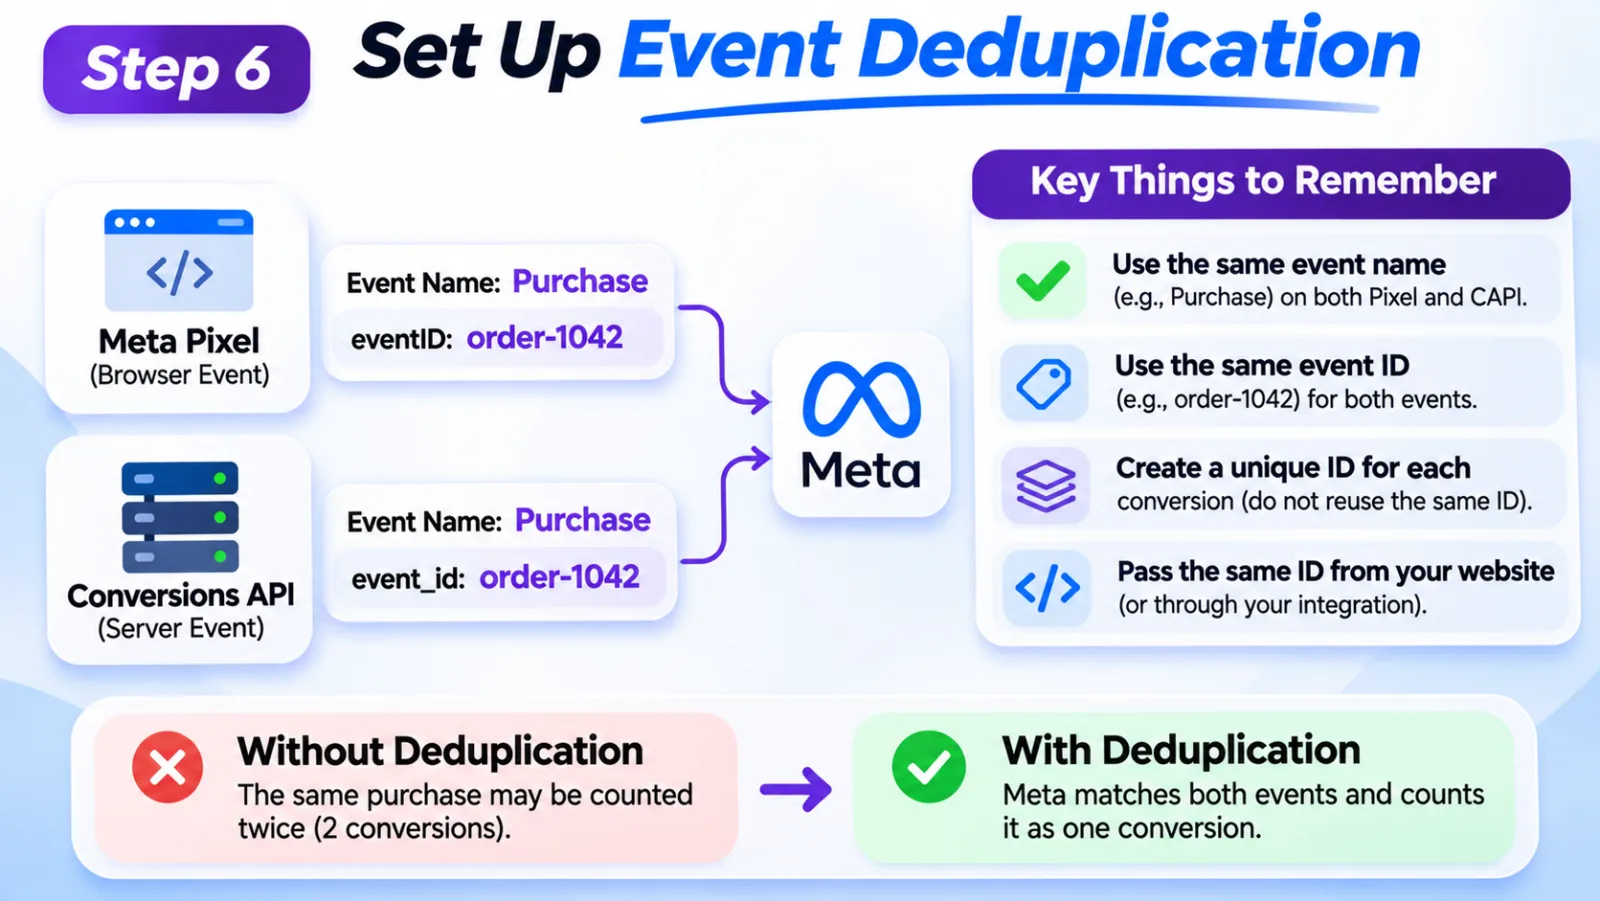
This is the step you should pay special attention to. When you use the Pixel and CAPI together, both can report the same conversion. For example, a customer completes an order. The Pixel sends a Purchase event from the browser, and your server sends another Purchase event through CAPI.
These are two messages about one purchase, not two separate purchases. If Meta cannot recognise that they belong together, your reporting may become inaccurate. To avoid this, Meta uses a process called event deduplication. The recommended setup uses the same event name and event ID for the browser and server copies of the same action.
Here is how it works. Imagine a customer places an order with the order number 1042. Your website can use a unique value such as order-1042 as the event ID. The Pixel event sends this value using the eventID field. The server event sends the same value using the event_id field. Notice that the field names are slightly different, but the ID value must match.
The event name must match as well. So, if the browser sends a Purchase event, the server should also send a Purchase event with the same event ID. Every separate conversion needs its own unique ID. Do not use the same fixed ID for every purchase, because that can cause different orders to be treated as duplicates.
For a custom website, a developer will usually need to make sure the same ID is passed to both the browser and server. If you use a partner integration, check its documentation to see how it handles event IDs and deduplication. Once this is configured, Meta can recognise matching events instead of treating them as two separate conversions. This is one of the most important checks to complete before trusting your conversion numbers.
Step 7: Test The Pixel And Server Events
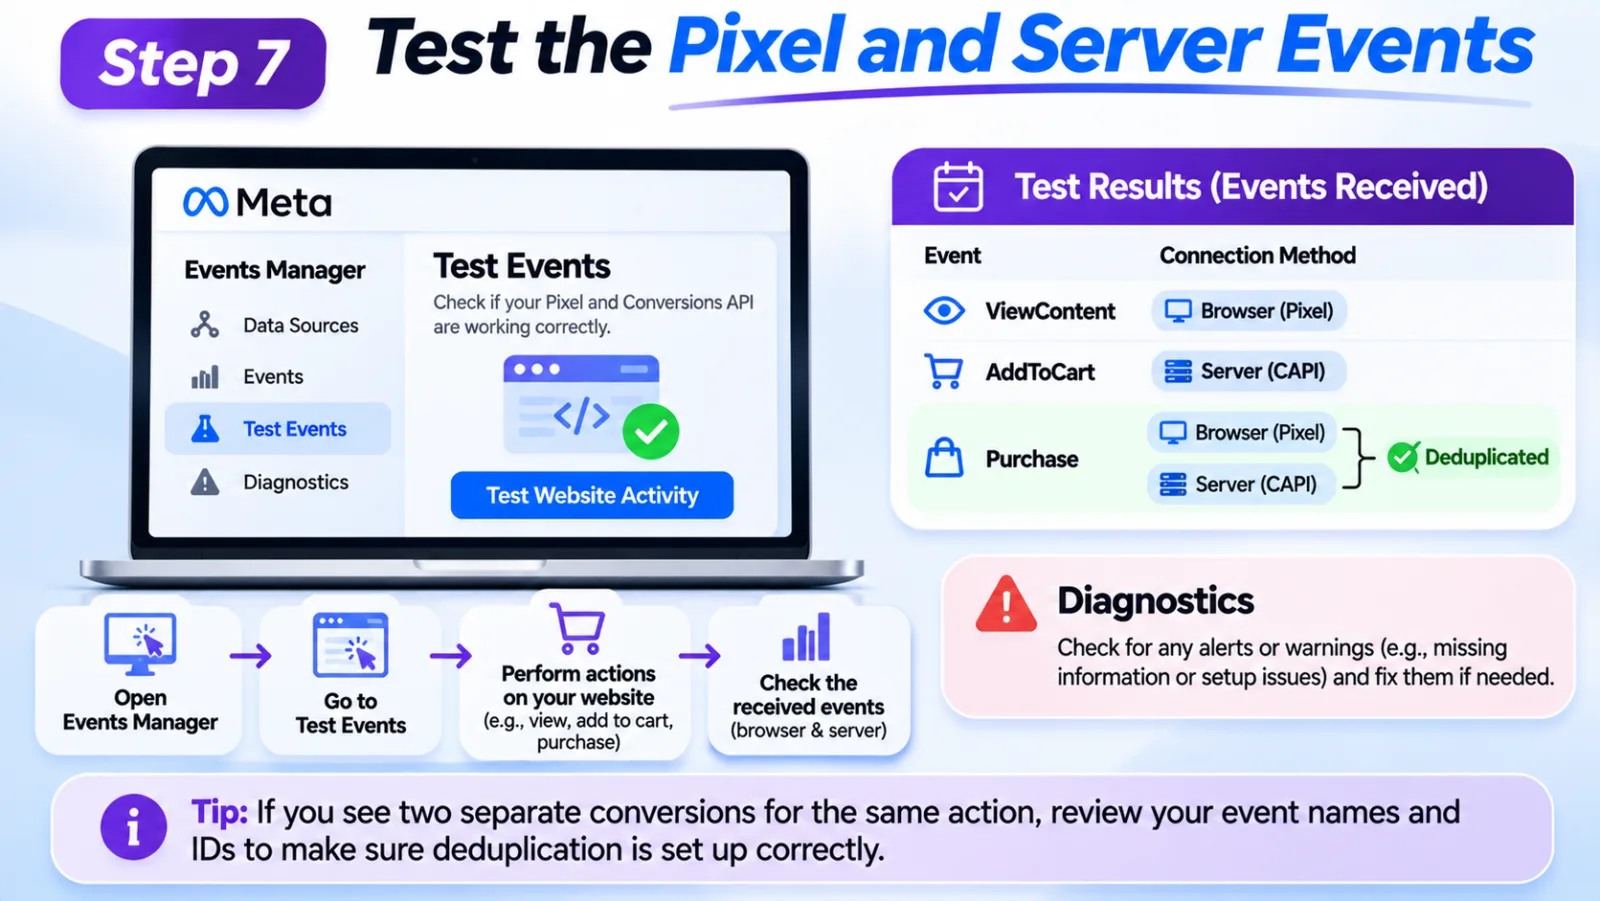
Now it is time to check whether everything is working. Do not skip this part, even if the installation seemed successful. Open Events Manager and select the data source connected to your website. Go to the Test Events section and follow the instructions for testing your website activity. Open your website in another browser window and perform a few actions. Visit a product page, add something to the cart, submit a test enquiry or complete a test purchase if your website allows it. Return to Events Manager and check which events have arrived. Look at the connection method to see whether each event came from the browser or the server.
If you are testing an event that both methods send, check whether Meta recognises the matching browser and server events as duplicates. If you see two separate conversions being counted, go back and review the event names and IDs. You should also look at the Diagnostics section. Meta may show warnings about missing information, event setup problems or other issues that need attention.
Do not worry if an event takes a little time to appear. Some integrations do not send everything instantly. Give the test a moment, but investigate if the expected events are still missing.
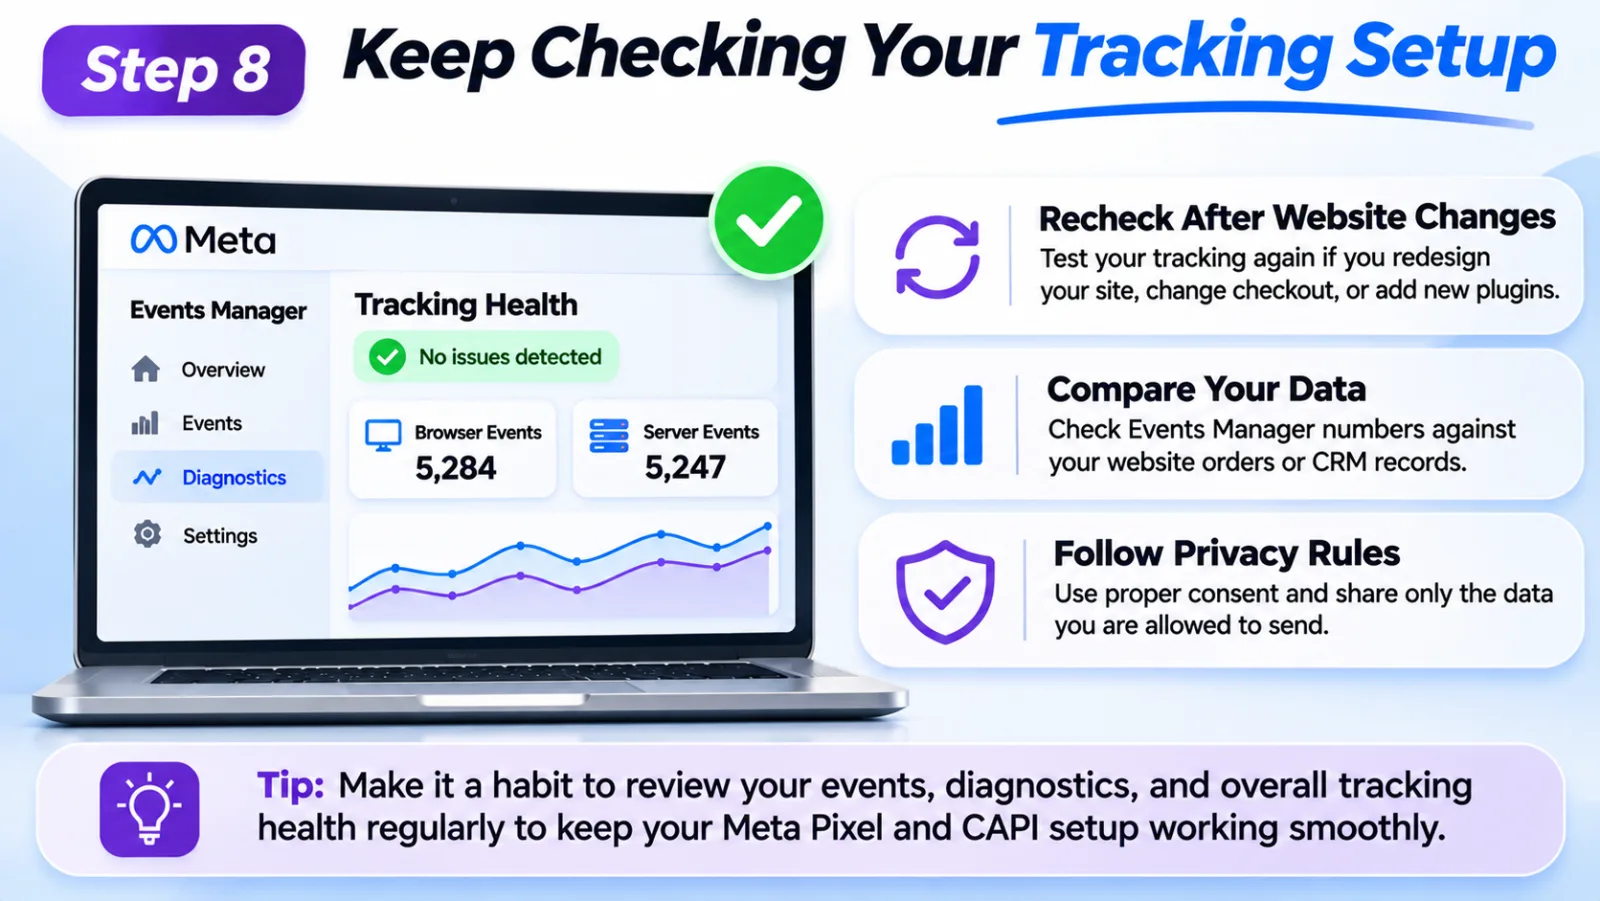
Step 8: Keep Checking Your Tracking Setup
Once the Pixel and CAPI are working, your job is not completely finished. Website changes can affect tracking, so it is worth checking the setup from time to time. For example, if you redesign your website, change your checkout system or install a new tracking plugin, some events may stop working or start firing twice. A quick test after these changes can help you catch problems early.
It is also a good idea to compare the numbers in Events Manager with your actual website orders or CRM records. The figures may not always be identical because Meta and your business systems can use different attribution and reporting methods. However, a large or sudden difference is worth investigating.
Finally, keep your privacy settings in mind. CAPI does not remove the need to follow consent requirements or applicable privacy laws. Only send information that your business is allowed to share, and make sure customer data is handled securely.
Common Mistakes To Avoid
One problem that often appears during setup is installing the Pixel more than once. This can happen when someone adds it through a plugin and then adds the same code manually. Check your website before adding another installation. Another issue is forgetting event deduplication. If the Pixel and server send the same purchase with different event IDs, Meta may not recognise them as the same action. This can make the reported conversion numbers misleading.
You should also avoid sending events at the wrong time. A person opening a checkout page is not the same as a person completing a purchase. Make sure the event reflects what actually happened. Finally, do not treat server-side tracking as a way around privacy rules. Customer information must still be collected and shared responsibly, whether it comes from a browser or a server.
Final Thoughts
Using Meta Pixel and Conversions API together can make website conversion tracking more reliable because you are not depending on browser tracking alone. The Pixel sends events from the visitor's browser, while CAPI provides another way to send information from your server. The setup itself is not the only thing that matters. You also need to choose the right events, connect both methods to the correct data source and make sure matching events use the same event ID.
If you are new to CAPI, start with a supported integration from your website platform. Test a few important events before using the data to make campaign decisions. If you have a custom website, ask your developer to check the event IDs and server requests carefully.
Accurate conversion tracking also matters when you compare results across advertising platforms. If you manage campaigns on native advertising networks as well, you can read our guide on tracking conversions across native ads agency accounts. It explains why keeping conversion data organised is important when working with multiple advertising accounts.
Agency ad accounts, without the wait.
Buy and top up Google, Meta, native, and more from one dashboard.
Get started
No comments yet. Be the first to comment.
Comments are open to registered AdScaleLab clients.
Sign in to comment