





How To Set Up MediaGo S2S Conversion Postback For Accurate Tracking
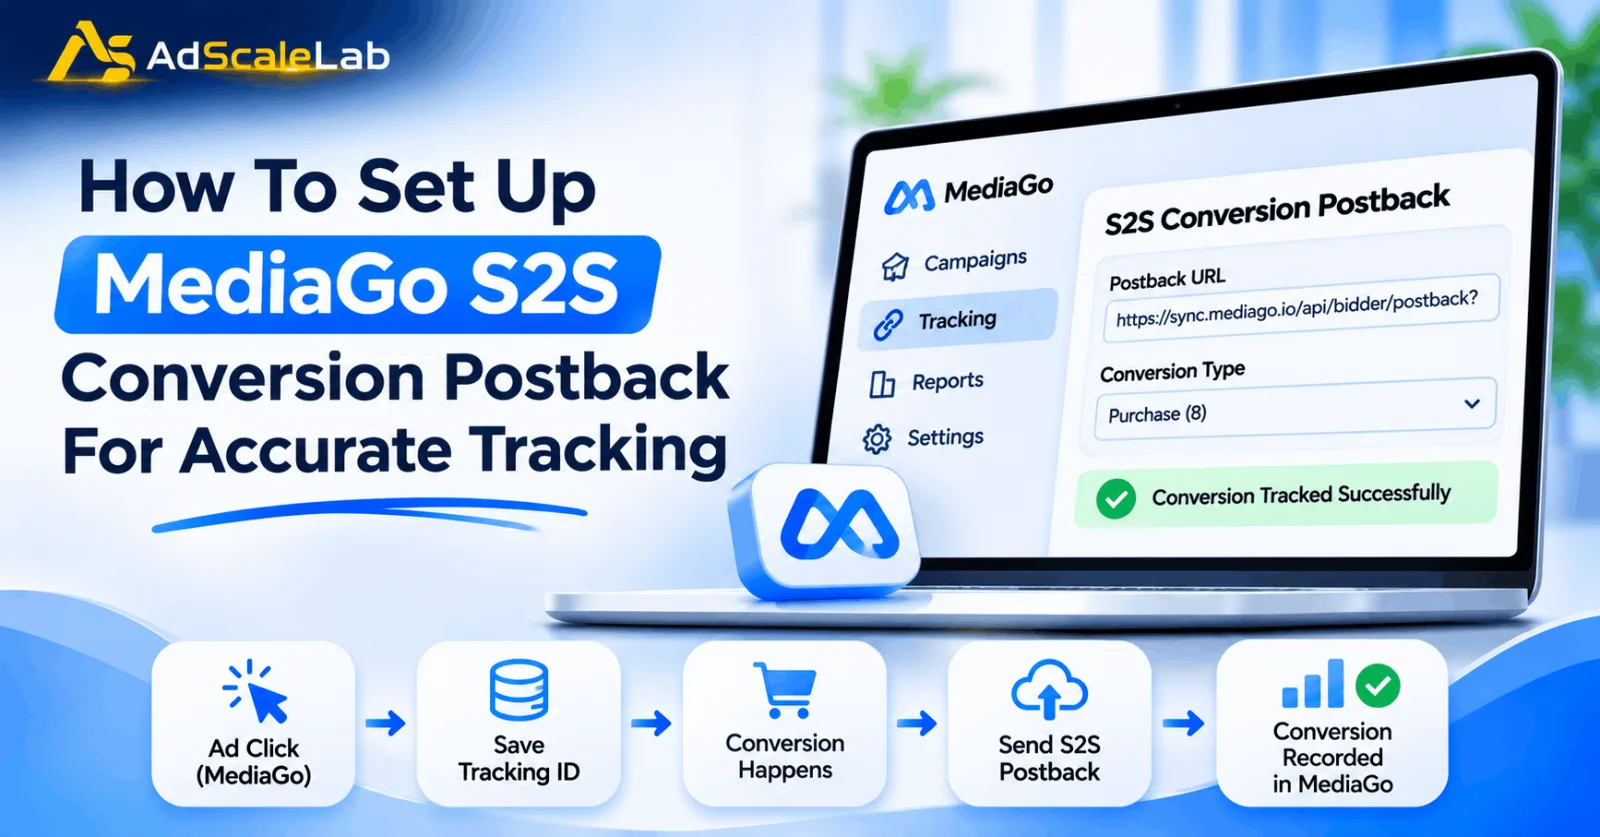
Getting clicks on your MediaGo advertisements is not always a sign that your campaign is performing well. What really matters is what people do after clicking those ads. Some visitors may leave your website, while others might register, submit a form or complete a purchase. If you cannot track these actions properly, it becomes difficult to understand whether your advertising money is being spent in the right place. This is a common problem for advertisers who focus only on clicks and do not have a proper conversion tracking setup.
The MediaGo S2S conversion postback can help solve this problem. It allows your website, server or tracking platform to send conversion information directly back to MediaGo. This helps connect an action completed on your website with the original advertising click. Let's take a simple example. Someone sees your MediaGo advertisement, clicks it and visits your landing page. After looking at your offer, the visitor fills out a registration form. You want MediaGo to know that this registration came from that particular advertisement.
For this to happen, your tracking system needs to save the original click ID and send it back to MediaGo when the registration is completed. That is basically how S2S conversion tracking works. The setup may look a little technical at first, especially if you have never worked with postback URLs. But once you understand how the tracking ID moves between MediaGo and your tracking system, the process becomes much easier.
In this guide, we will go through the setup step by step, explain the important parameters and show you what to check if conversions are not appearing correctly.
What Is MediaGo S2S Conversion Postback?
S2S stands for Server-to-Server. In simple words, it means that two servers communicate directly to exchange information. In advertising, this method is commonly used to report conversions. Instead of depending only on a tracking script running inside a visitor's browser, your website or tracking platform sends conversion information directly to the advertising platform.
MediaGo uses a tracking ID to connect an advertisement click with a conversion that happens later. For example, when someone clicks your advertisement, MediaGo generates a unique tracking ID. This ID is passed through your campaign tracking URL. Your website or tracking platform receives it and saves it.
Now imagine that the same visitor completes a purchase a few minutes later. Your tracking system can use the saved tracking ID to send a postback request to MediaGo. This tells MediaGo which advertising click was connected to that purchase.
The tracking ID is the most important part of this process. If it is not captured or returned correctly, MediaGo will not be able to match the conversion with the original click. You can find the technical details in MediaGo's official S2S Conversion Postback documentation.
Why Is S2S Conversion Tracking Important For MediaGo Advertisers?
Suppose you are spending $100 every day on a MediaGo campaign. Your dashboard shows that the advertisements are receiving clicks, but you do not know how many visitors are actually becoming customers.
Would you increase the budget based only on those clicks? Probably not.
You need to know whether those visitors are registering, submitting enquiries or making purchases. Otherwise, you are making campaign decisions without seeing the complete picture. This is where S2S tracking becomes useful. It gives your tracking system a way to report actions that happen after the original advertising click. It is particularly helpful for lead generation and affiliate campaigns. For example, an advertiser may want to track a submitted lead separately from a qualified lead. An e-commerce advertiser may want to report completed purchases along with their revenue value. Get Mediago agency account here

Another reason advertisers use S2S tracking is that it does not depend on a conversion script running in the visitor's browser at the time the conversion is reported. Server communication can help avoid some browser-related tracking limitations, although it does not guarantee that every conversion will be recorded. For agencies and media buyers managing several campaigns, having this information makes it easier to understand where the results are coming from and which campaigns need attention.
How Does MediaGo S2S Postback Tracking Actually Work?
Before getting into the settings, let's understand what happens behind the scenes.
First, a visitor clicks your MediaGo advertisement. MediaGo generates a tracking ID and passes it through the tracking parameters added to your campaign URL. Your landing page receives that ID. Your tracking platform or website backend saves it so that it is available later. The visitor then completes an action, such as submitting a lead form or purchasing a product. Your system identifies the saved tracking ID and sends a postback request to MediaGo. MediaGo receives the request and uses the tracking ID to connect the conversion with the original click.
The complete process looks like this:
Ad click → Tracking ID generated → ID saved by your system → Conversion completed → Postback sent to MediaGo → Conversion recorded.
One thing to remember is that the tracking ID must travel through the entire process. Simply adding a tracking parameter to your campaign URL will not be enough if your website or tracker does not save and return its value.
How To Set Up MediaGo S2S Conversion Postback Step By Step
Now let's get into the actual setup. You will need access to your MediaGo campaign settings and your tracking platform or website backend. If you do not manage the technical side of your website, your developer or tracking-platform provider may need to help with some of these steps.
Step 1: Check Your Existing Tracking Setup
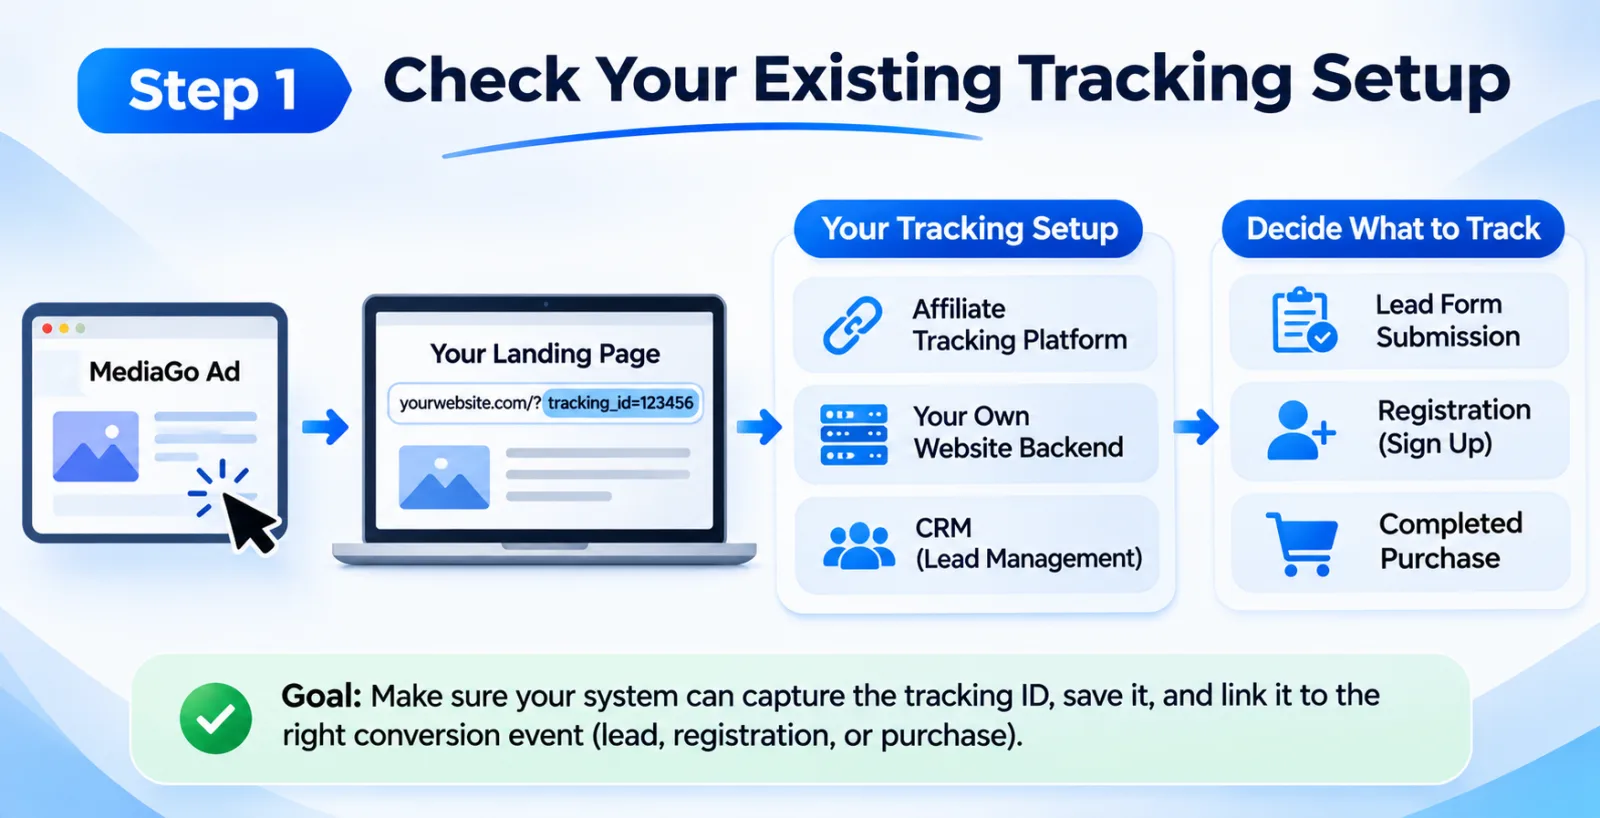
Before changing anything in MediaGo, take a look at how your website currently records visitors and conversions. Are you using an affiliate tracking platform? Do you have your own website backend? Or are you using a CRM to manage incoming leads? The answer matters because the tracking ID needs to be saved somewhere after the visitor clicks your advertisement.
For example, if someone clicks your MediaGo ad and reaches your landing page, your system should be able to read the tracking ID from the URL. It should then keep that ID connected to the visitor's session or conversion record.
Also, decide which actions you actually want to track. A lead form submission, a registration and a completed purchase are different events. Knowing this before starting will make the rest of the setup easier.
Step 2: Add The Tracking Parameters To Your MediaGo Campaign
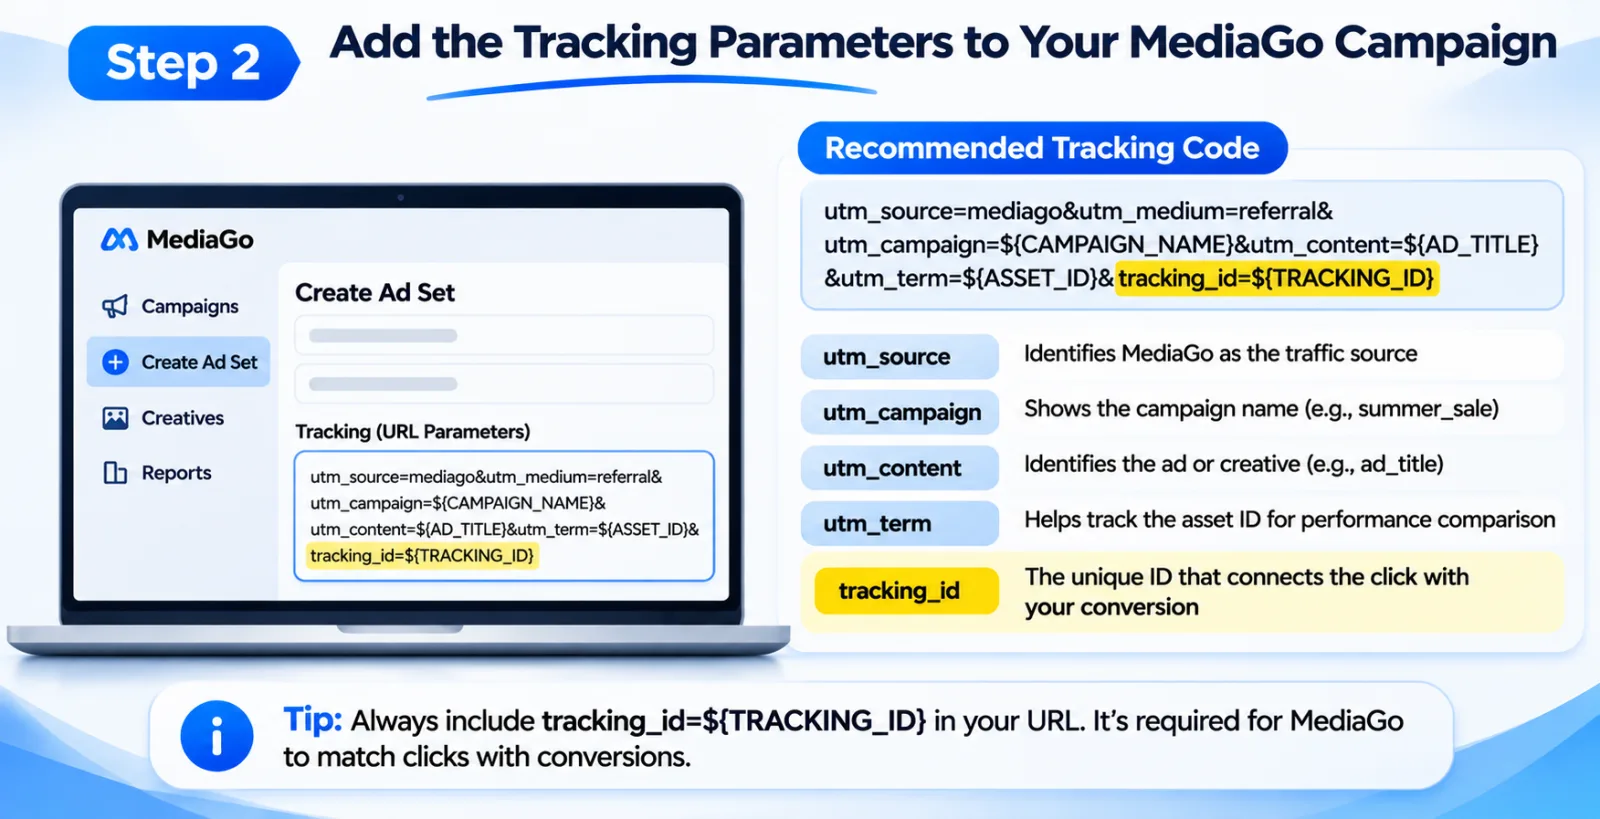
Once you understand your existing tracking setup, open your MediaGo campaign settings. According to MediaGo's official documentation, tracking parameters can be added in the Tracking field at the bottom of the Create Ad Set page.
MediaGo provides this recommended tracking code:
utm_source=mediago&utm_medium=referral&utm_campaign=${CAMPAIGN_NAME}&utm_content=${AD_TITLE}
&utm_term=${ASSET_ID}&tracking_id=${TRACKING_ID}
You do not need to memorize every parameter, but you should understand what the important ones do. The utm_source parameter identifies MediaGo as the traffic source. The campaign parameter helps identify the campaign, while the content parameter can help identify the advertisement. The asset ID is also useful when comparing traffic from different advertising assets.
However, the parameter you should pay the most attention to is:
tracking_id=${TRACKING_ID}This is the value that connects the original click with the conversion reported later. MediaGo replaces the macro with the actual tracking ID when the user clicks the advertisement. Make sure you do not accidentally remove this parameter while editing your tracking URL. You can also check MediaGo's official URL Parameter Tracking guide to understand the available parameters and macros.
Step 3: Make Sure Your Website Saves The Tracking ID
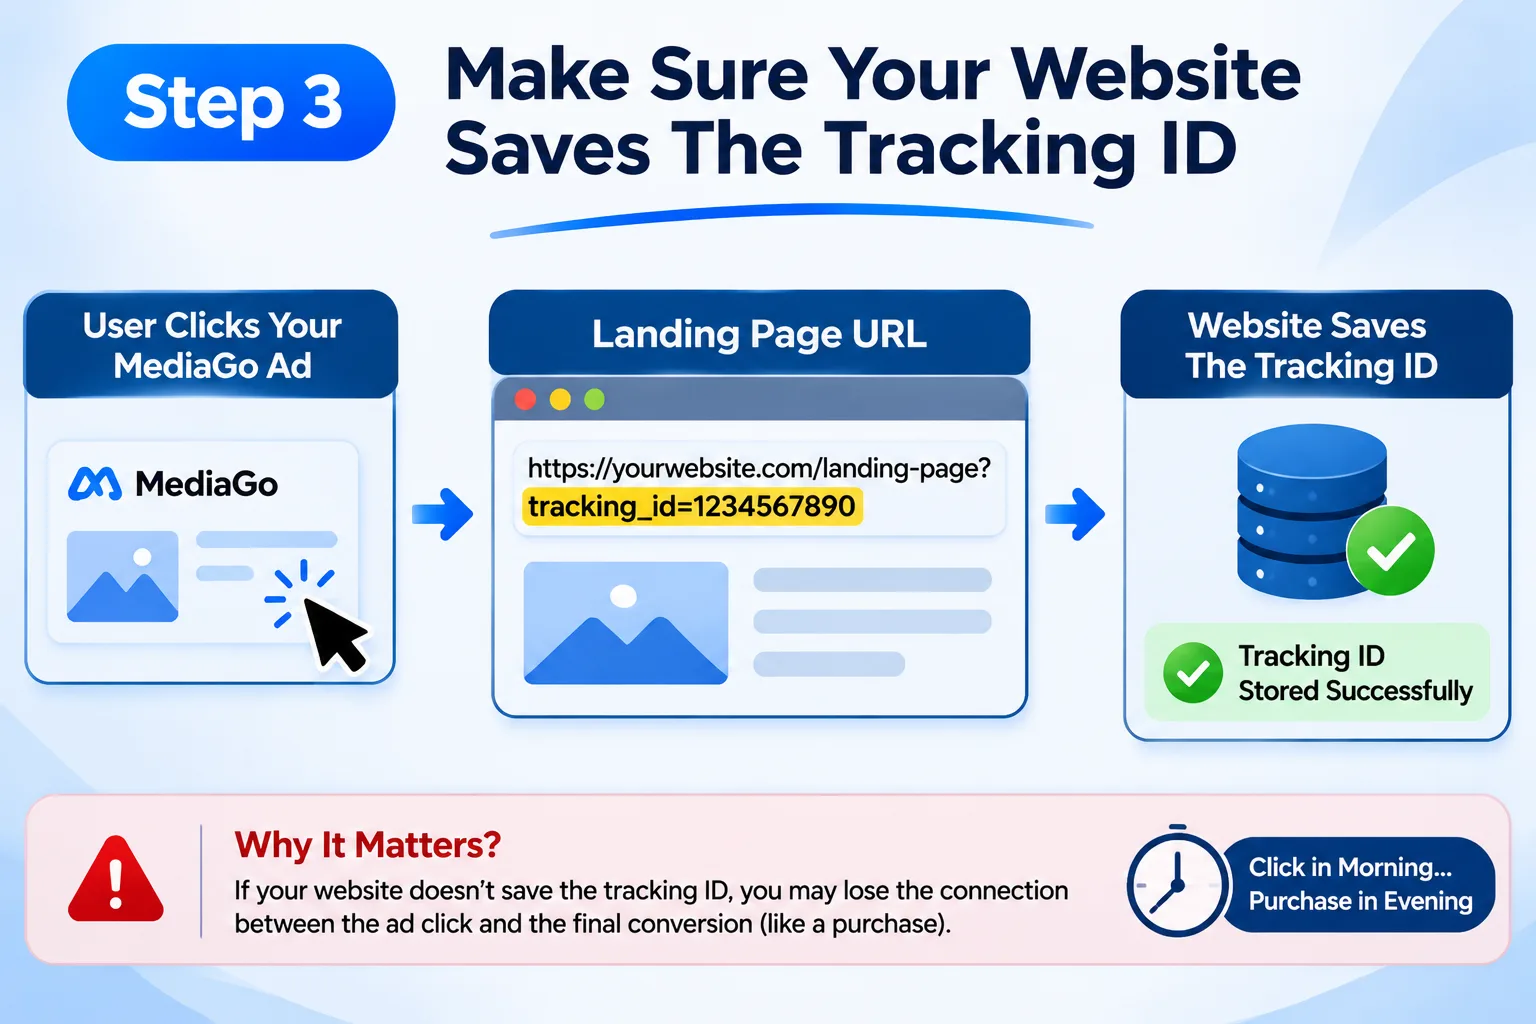
This is where many tracking setups can go wrong. You may have added the correct tracking parameter in MediaGo, but what happens when a visitor reaches your website? Does your website actually save that value?
For example, after someone clicks your advertisement, your landing page URL might look something like this:
https://yourwebsite.com/landing-page?tracking_id=1234567890The number here is only an example. The actual tracking ID will be generated by MediaGo. Your website or tracking platform needs to read the tracking_id value and save it with the visitor's information. This could be handled through your tracking platform, session storage or backend, depending on how your system is built.
Why does this matter?
Imagine someone clicks your advertisement in the morning but does not complete a purchase until the evening. If your system has already lost the original tracking ID, it may not be able to connect that purchase with the earlier click. So, before moving forward, ask your developer or tracking-platform provider to confirm that the ID is being captured and stored correctly.
Step 4: Prepare The MediaGo Postback URL
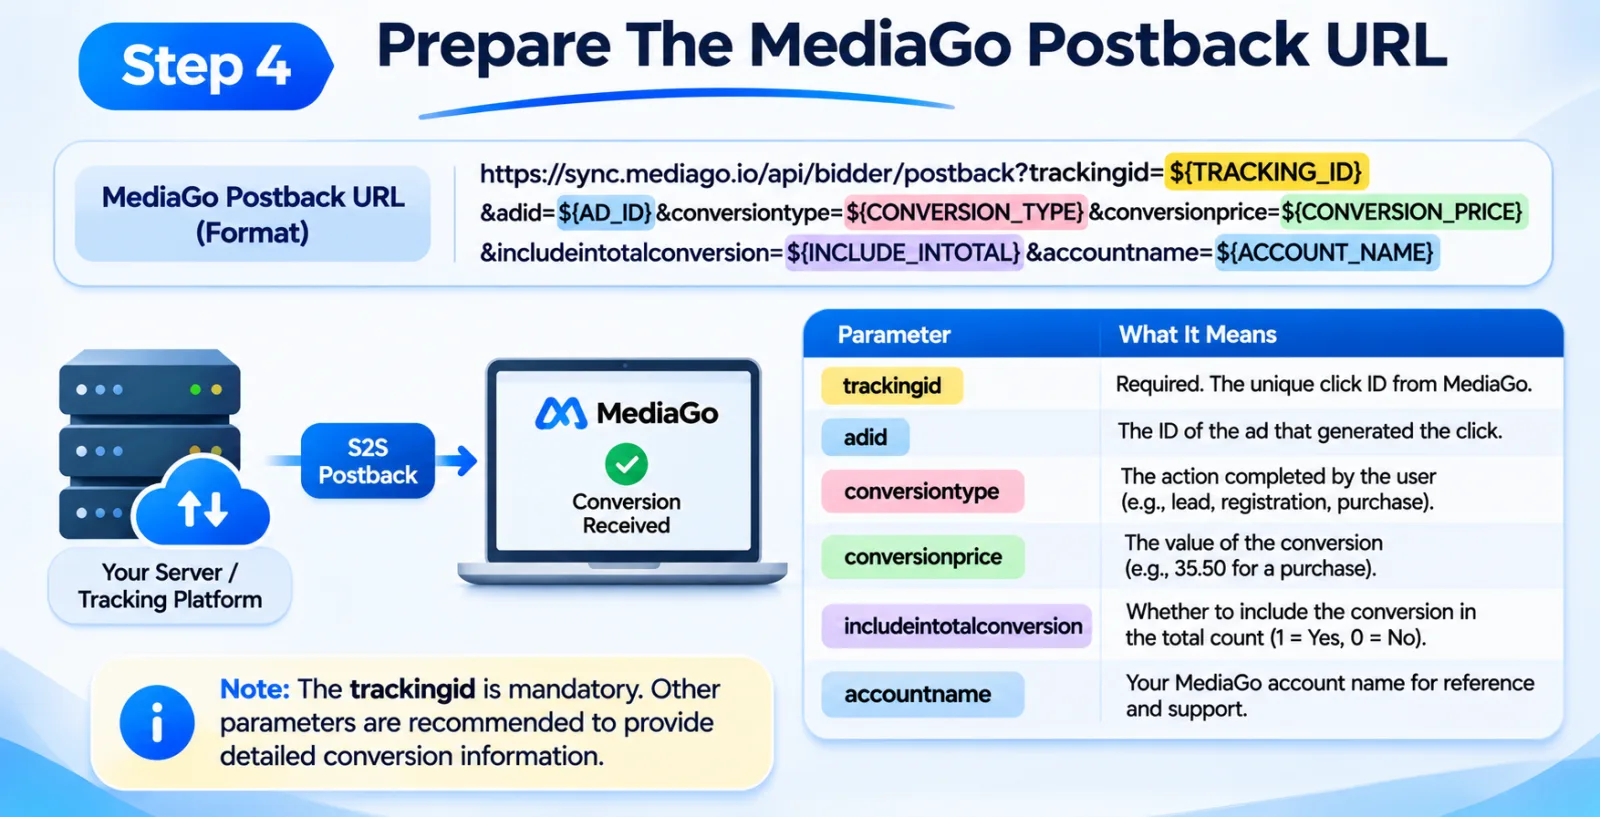
After confirming that your system can save the tracking ID, the next job is to prepare the postback URL. MediaGo provides the following format:
https://sync.mediago.io/api/bidder/postback?trackingid=${TRACKING_ID}&adid=${AD_ID}
&conversiontype=${CONVERSION_TYPE}&conversionprice=${CONVERSION_PRICE}
&includeintotalconversion=${INCLUDE_INTOTAL}&accountname=${ACCOUNT_NAME}
At first, this URL may look confusing because it contains several parameters. But each one has a specific purpose.
The trackingid parameter is the most important one because it carries the original click ID. The adid parameter identifies the advertisement associated with the click. The conversiontype parameter tells MediaGo what action the visitor completed. For example, it could be a lead, registration or purchase. The conversionprice parameter carries the value of the conversion. If someone purchases a product worth 35.50, your system can send that value with the postback. The includeintotalconversion parameter controls whether the event is included in the total conversion count. Its value can be 1 or 0. Finally, accountname identifies your MediaGo account and can be useful when investigating tracking problems with support.
MediaGo requires the tracking ID, while the other parameters are recommended for providing additional conversion information.
Step 5: Choose The Conversion Type You Want To Report
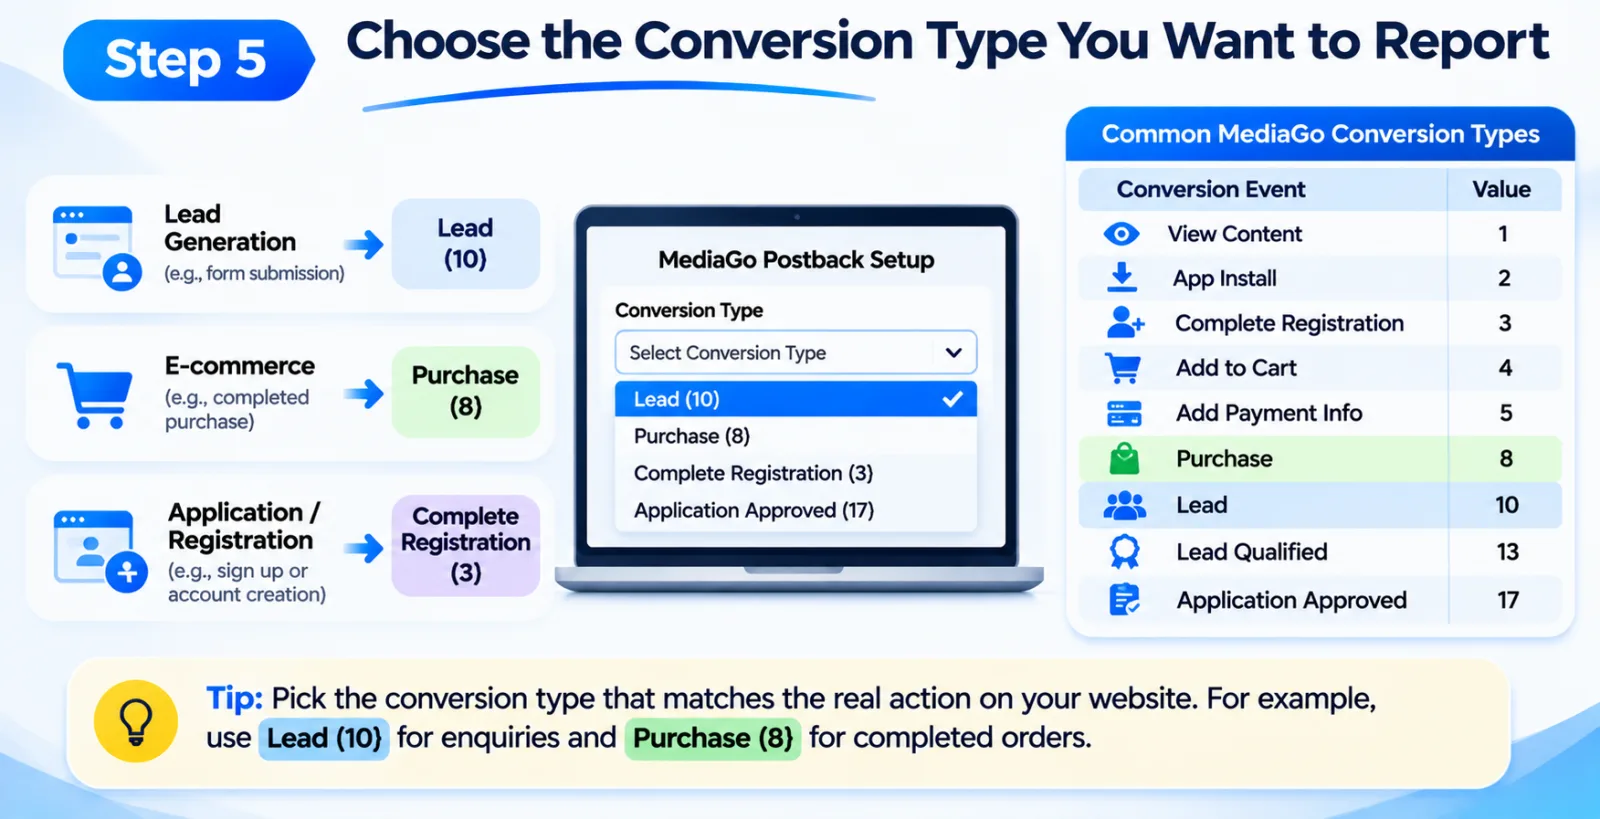
Not every advertiser is looking for the same result. A lead generation advertiser may care about submitted forms, while an online store may focus on completed purchases. Someone promoting an application may want to track registrations or approved applications.
MediaGo supports different conversion types for these actions. You need to choose the value that matches the event happening on your website. Here are some of the conversion types listed in MediaGo's official documentation:
For example, if your campaign is collecting customer enquiries, you can use the Lead event with the value 10. If you are tracking completed online orders, use the Purchase event with the value 8.
The important thing is to report what actually happened. If a visitor only adds a product to the cart, do not report it as a completed purchase. Otherwise, your campaign reports will not show the real results.
Step 6: Connect Your Tracking Platform To The Postback URL
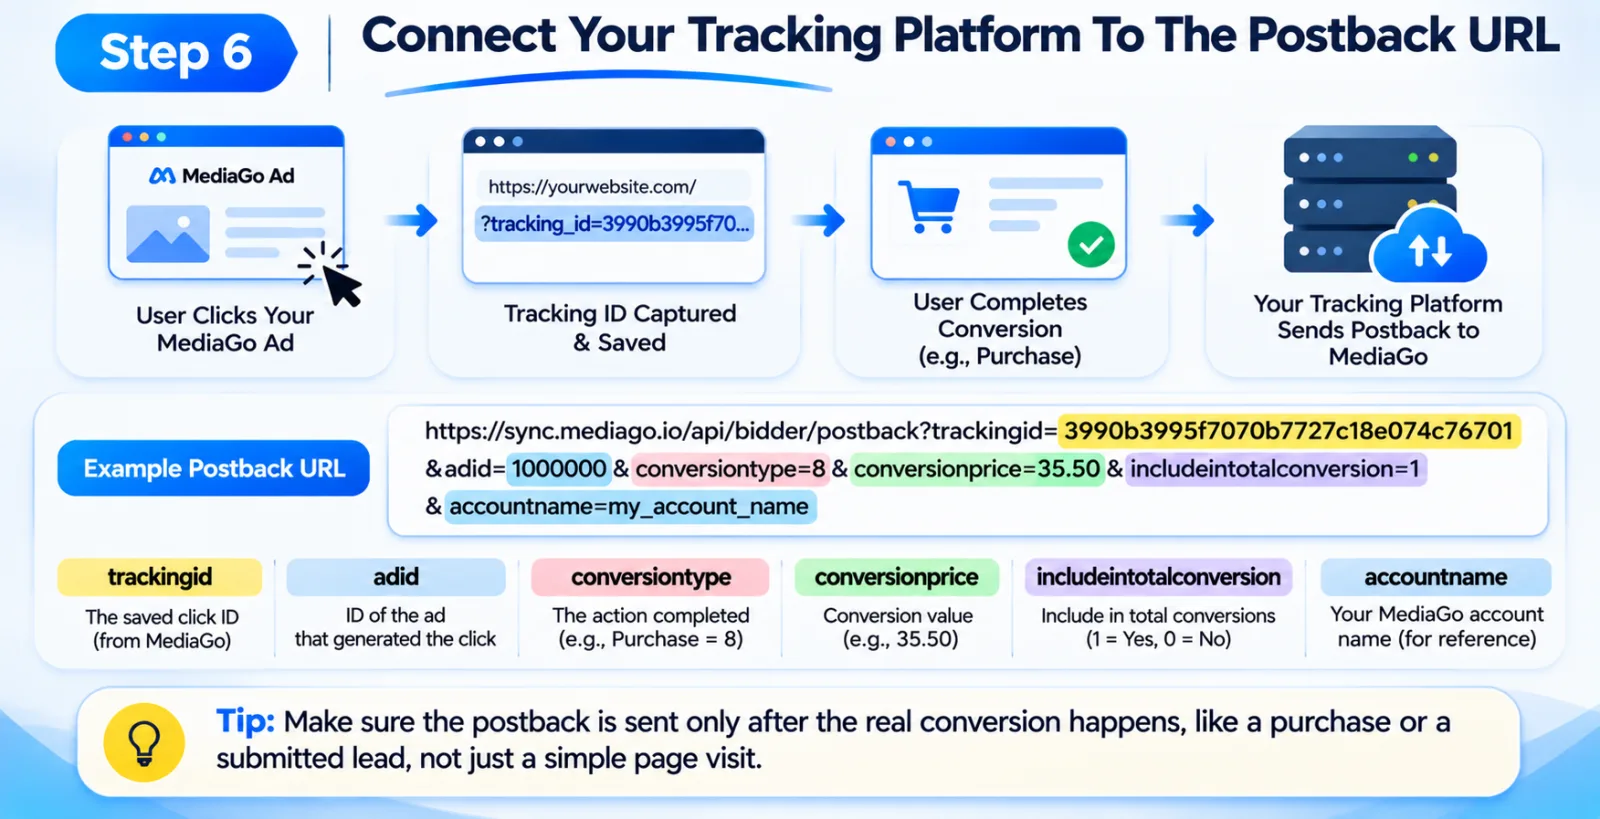
Now you have the tracking ID, the postback URL and the conversion type. The next step is connecting everything through your tracking platform or website backend. This part depends on the system you are using. Some tracking platforms provide their own postback settings, while a custom website may need a developer to configure the server request. The idea is simple: when the selected conversion happens, your system should take the tracking ID saved earlier and insert it into the trackingid field of the MediaGo postback URL.
Let's say a visitor clicks your advertisement and receives this example tracking ID:
3990b3995f7070b7727c18e074c76701Later, the visitor completes a purchase worth 35.50. All the values in this example are for demonstration purposes. Your actual tracking ID, ad ID, conversion value and account name will be different. Make sure your system sends the request only when the selected conversion has actually happened. A page visit should not automatically be reported as a purchase or completed lead.
Step 7: Decide How To Report Intermediate And Final Conversions
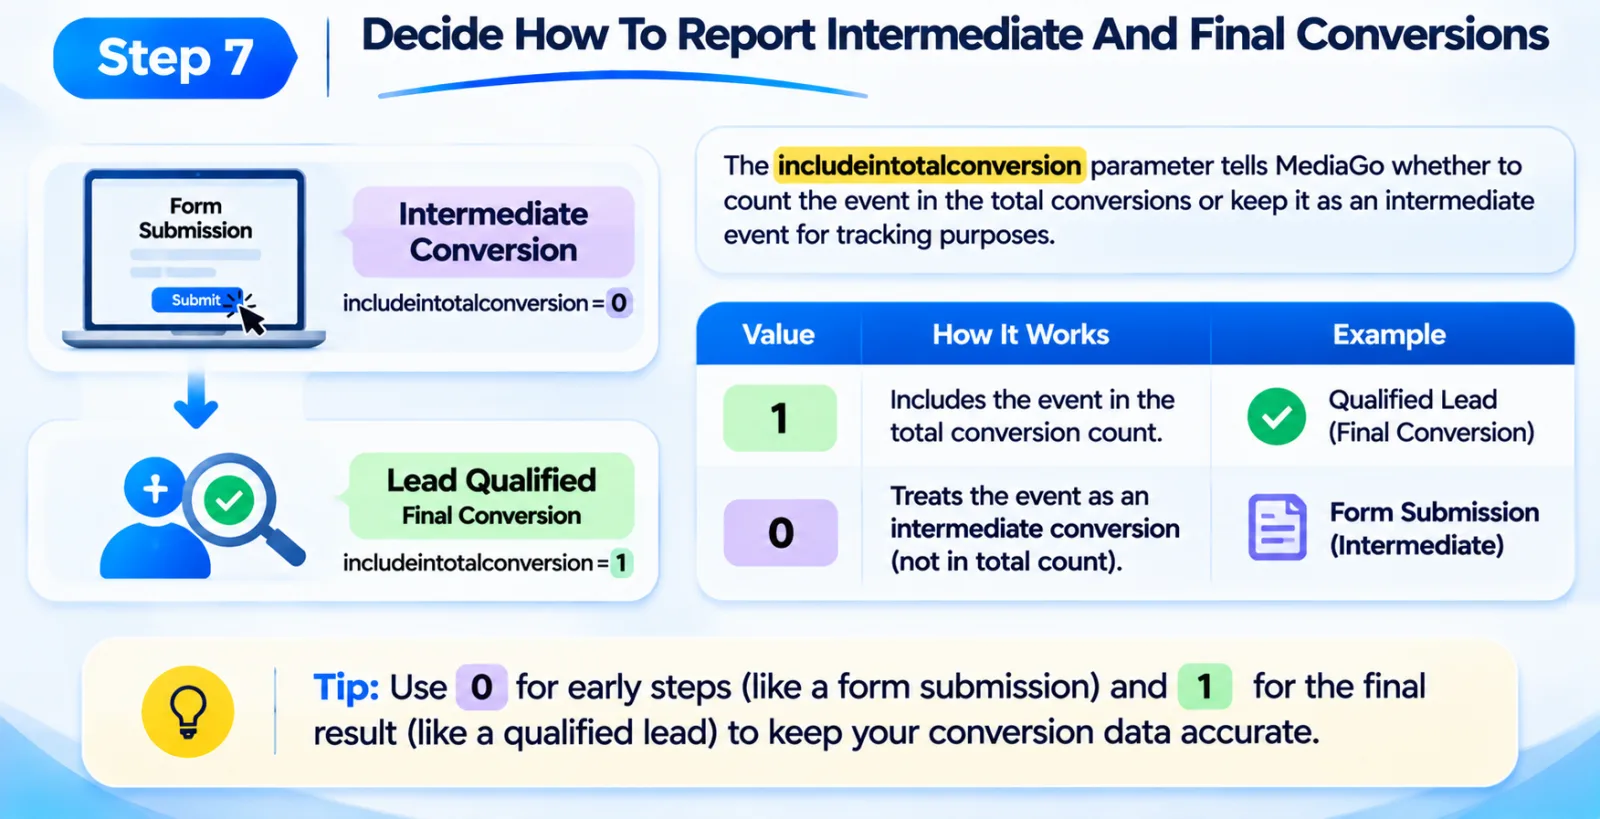
Some advertisers want to track more than one stage of the customer journey. For example, a lead generation campaign may first receive a form submission. Later, the sales team may check the lead and decide whether it is qualified. Both actions are useful, but they do not necessarily have the same value to the advertiser. This is where the includeintotalconversion parameter becomes important.
When you set it to 1, the event is included in the total conversion column in MediaGo. When you set it to 0, the event is treated as an intermediate conversion. It is not included in the total conversion column, but it is included in its corresponding conversion type column.
For example, you might report a form submission as an intermediate event and a qualified lead as a more important final event. This gives you a way to understand different stages without adding every event to the total conversion count.
Before choosing the values, think about what your campaign is actually trying to achieve. If you count every small action as a final conversion, your total conversion numbers may look better than the real business results.
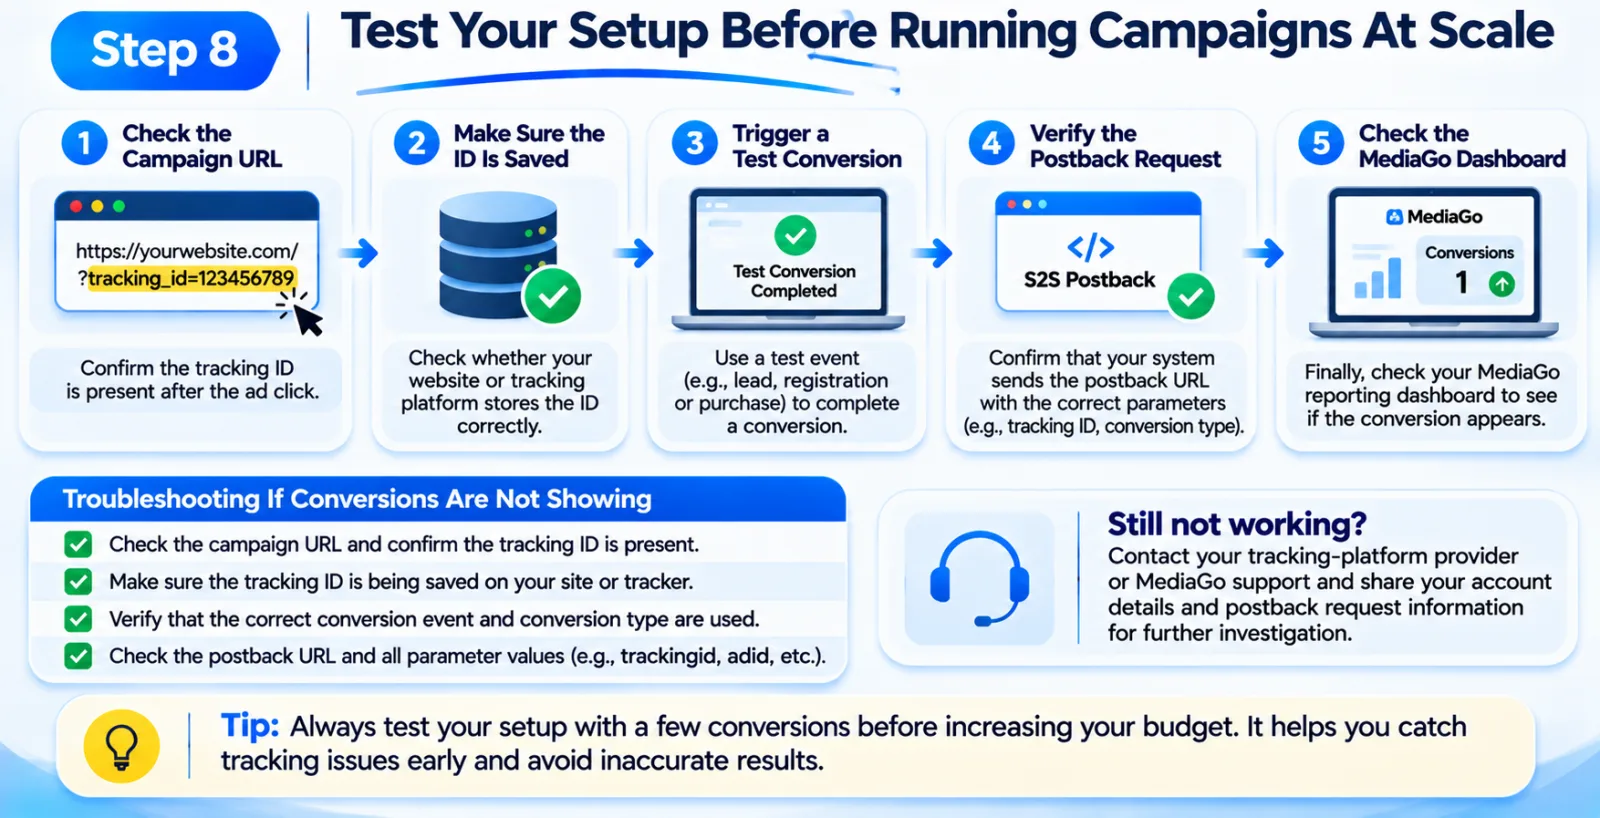
Step 8: Test Your Setup Before Running Campaigns At Scale
You have added the tracking parameters, saved the tracking ID and configured the postback. But how do you know everything is working? The best way is to test the complete process before depending on it for campaign optimization.
Start by checking the campaign URL after an ad click. Confirm that the tracking ID is present and that your website or tracking platform receives it. Next, check whether the ID is being saved correctly. Then use an appropriate test conversion or controlled test event to see whether your system sends the postback with the correct information.
Finally, check your MediaGo reporting dashboard to see whether the conversion appears.
If the conversion does not show up, go back through the process one part at a time. Check the original click, tracking ID, conversion event and postback request. It is much easier to find the problem this way than to change several settings without knowing what went wrong. If you are still unable to identify the issue, contact your tracking-platform provider or MediaGo support. Share the relevant account details and request information so they can help investigate the problem. It is always better to find a tracking issue before increasing your advertising budget.
Common Problems Advertisers May Face With MediaGo S2S Tracking
Even when the setup looks correct, a few small mistakes can stop conversions from appearing as expected. One of the first things to check is the tracking ID. Sometimes advertisers add the parameter to their campaign URL but forget to configure their website to save its value. In other cases, a developer may change the landing page and accidentally remove the tracking parameter. If this happens, your system may not have the information needed to report the conversion.
Another problem is choosing the wrong conversion type. For example, a registration may be reported as a purchase by mistake. This can make your reporting confusing because the event shown in MediaGo does not match what happened on your website. You should also check the conversion price. If your tracker sends an incorrect value or a number in the wrong format, the revenue information may not be useful for campaign analysis. MediaGo recommends sending the conversion price as a number without commas. The includeintotalconversion parameter is another setting worth checking. If you use the wrong value for intermediate events, your total conversion count may not represent the actual number of final conversions.
Finally, make sure the postback is triggered at the correct time. For example, a lead should be reported after the form has been successfully submitted, not simply when someone opens the form.
A Few Tips To Keep Your MediaGo Conversion Tracking Accurate
Once everything is working, do not assume that you will never need to check it again. Tracking can be affected by changes to your website, landing pages or advertising setup. Whenever you make changes to your campaign URL, check that the tracking parameters are still present. If you update your landing page or move to a different tracking platform, confirm that the tracking ID is still being saved.
It is also worth keeping your conversion events organized. Use the same event definitions across your reporting system so that a lead, registration and purchase are not mixed together. If your campaign uses revenue tracking, check the values being sent to MediaGo. Even a small mistake in conversion values can affect the way you understand campaign performance. Most importantly, test the setup whenever you make a major change. A quick check can help you catch a tracking problem before it affects several days of campaign data.
Final Thoughts
Setting up MediaGo S2S conversion postback may seem complicated when you first look at the tracking URL and all its parameters. But the actual process follows a simple idea. Someone clicks your advertisement, MediaGo generates a tracking ID, your system saves that ID, and later your server sends it back when the visitor completes an action.
The most important part is making sure the same tracking ID is carried through the entire process. If it is missing or not saved correctly, your conversion information may not be matched with the original advertising click.
For media buyers and agencies running MediaGo campaigns, checking this setup is an important part of managing advertising performance. After all, knowing how many clicks you receive is useful, but knowing how many of those clicks turn into real leads or sales is much more valuable. If you are looking for MediaGo advertising account solutions, you can also visit AdScaleLab's MediaGo network page to learn more about the available account options.
Agency ad accounts, without the wait.
Buy and top up Google, Meta, native, and more from one dashboard.
Get started

No comments yet. Be the first to comment.
Comments are open to registered AdScaleLab clients.
Sign in to comment